Are you looking for a guide on how to connect Epson printer to MacBook? Look no further than this post. In this tutorial, you will learn how to add your printer using a Mac computer. The process is simple to do; all you need is an Epson printer and a computer.
Connecting your printer to a computer is a breeze; however, it can be daunting for some novice users. But fear not! I was also confused and unsure about my Epson printer setup. Having worked as a printer technician, I can now help you connect Epson printer to Mac in no time.
So, I will share the easy 4 steps to connect your printer to your MacBook. Let’s get into it without any further ado!
Step 1: First, Check Compatibility
Before we learn how to connect Epson printer to MacBook, we must check the computer system compatibility of our printer. This step is essential as it will help you figure out the right computer to use to establish a connection with your printer. Otherwise, it may hinder you from connecting your printer to your MacBook.
When I connected one of my customers’ printers to his Mac, I first ensured compatibility. If you also want to check or confirm your system’s compatibility, you can navigate to Epson’s official website and move to the Support section.
Everything was mentioned regarding Epson printer compatibility with macOS. I also found the detailed specifications for each type of printer model, along with the compatible macOS versions and other related info.
Step 2: Then, Connect Epson Printer to Mac
When I ensured that my customer’s printer met all the requirements, I moved to the next steps, connecting his printer to his Mac by using a physical connection between these two devices.
Below, I have explained how to connect Epson printer to MacBooK for Wi-Fi and USB printers. You can opt for any one method that suits your printer type.
Method 1: Using a USB Printer
Connecting via a USB cable is easy. All you need to do is connect one end of the USB cable to the computer’s USB port and another to the printer’s USB port. If you receive a prompt to download new printer software, you should proceed with the download and installation to your system.
Note: If your MacBook has a single USB-C port, you should use a multiport adapter. Connect the printer and then add a USB-C to the power socket to increase the life of your Mac’s battery.
Method 2: With a Wi-Fi Printer
In order to connect your wireless printer via Wi-Fi to your MacBook, I will walk you through the steps that I have already explained below. But you should know that the instructions below work only for those who want to connect their printer using the control panel.
Here are the simplified steps to connect your Wi-Fi printer using a printer’s control panel:
- On your control panel, when you see the “Know Your Wireless Network” screen appear, you have to click on Continue.
- Also, you should follow the on-screen instructions to select the wireless network from the printer’s Control Panel.
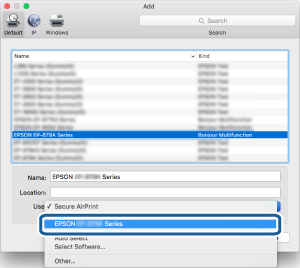
- When you notice the Add Printer screen on your Mac, you have to select the Epson product from the use drop-down menu.
- Then, hit the Add Printer.
- Afterward, you have to select the Print Test Page and continue the button.
- Next, select Set Up Fax or click on Continue to set up fax settings later.
- Finally, follow all the displayed steps on the screen to finish the process.
Now, you understand how to connect Epson printer to MacBook. Now, you can download the requisite software to setup your printer and use it for printing, scanning, and faxing your documents or projects.


